Building a Scenario
In this post, I’ll go through the steps I take to make a scenario, or level, for InnerSpace. However, two things before we get started: 1) There may be what some consider spoilers in this post and, 2) We’re in early development, so there are still placeholders in place for certain elements of the game.
What is a Scenario?
Scenario is kind of a unique term that we’re using with InnerSpace to refer to our “levels.” Since our world consists of large bubbles that are open for the player to fly/swim around as he or she pleases, we’re designing scenarios to be placed into these bubbles. If you’ve ever played Skyrim, think of these as the forts that are scattered throughout the world, or as the dungeons. In a way, they’re levels inside of a larger level…level-ception (queue the Hans Zimmer-esque brass section).

The Process
Step One: Design
Design inspiration can come from anything. I get ideas from games, movies, books, and even architecture. For example, the scenario that I’m going to walk through today came from an idea from the Harry Potter series.
Once I have the initial idea, I start drawing. Using graph paper (and a lot of it), I begin to draw out how I wanted the level to look. Once I have a solid idea the dimensions are mapped, I move on to step two.
Step Two: Whitebox and Prototype
This step is the first time I go into the software; in the case of InnerSpace, that’s Unity 5. A Unity plug-in called Probuilder 2, made by ProCore, helps a lot with the quick creation of whiteboxes, which are levels built out of simple shapes, like cubes.
Once I have the whitebox looking how I want it to look, I do the most important thing any level designer can do: I playtest it. And once I’ve playtested it for a while, I continue playtesting. While playtesting, I continue to make notes on my graph paper. I tweak the sizes of objects and areas, and I add and remove walls until I’m ready to make the changes to the actual level, inside Unity. And this is where I get my best work done: the process of playtesting and tweaking levels. I’ve never met a level designer who has produced a perfect level on the first try. I add one block and then playtest that one area for ten minutes before moving on, and so on.
While whiteboxing is the process of making a level out of primitives, prototyping is the process of making a level function how I imagined. (This is where I put on my programmer hat.) I’m, by no means, a master programmer, but I try. It’s important to me that everyone else on the team can have a full understanding of my idea for a level, so I prototype.
Once I have my level prototyped and whiteboxed, I playtest, again, and make any necessary changes. Then, I move to step three.

Step Three: Make it pretty
In last month’s Kickstarter update, we talked a little about the modular system we’re using for the towers in the game. We’re doing this for a number of reasons, one of which being so that someone like me can build pretty towers and scenarios without constantly bothering the artists to make me pieces. This is a new way of building levels for me and has taken some getting used to, but it has worked out extremely well so far. Typically, I’d build whitebox a level, making sure it’s fun to play and works how I want, then pass on the whitebox dimensions to environment artists for them to build specific pieces (assets) for me to place. The way we’re building InnerSpace actually is a little like using Forge, in Halo, in that I already have all the pieces I need. Since I already start with all of the pieces, it’s up to me (and the critiques of three artists and a creative director) to make a scenario that’s interesting, both in looks and in gameplay.
Once I figure out the modular pieces that fit my scenario best, I move on to step four.
Step Four: Back to the Drawing Board
After adding the modular pieces, I’m forced to return to the initial design and make changes. Since I am limited by the pieces that I’m given, I have to sometimes tweak and bend my levels around them. At this step, I bring out more graph paper and sketch out any changes that need to be made to the interior of the pieces. And one by one, I implement those changes, playingtesting each change as I get them in.
The Harry Potter Scenario
So, that’s the process of making a scewnario, in general terms. Now, I want to walk you through, step by step, me making an actual scenario from the game.
Step One:
In Harry Potter, there exists a set of stairs that moves, often leading the students to the wrong location (as seen in The Sorcerer’s Stone). I realized that something like that in InnerSpace would do a few different things: 1) create an interesting challenge while flying, since the player now would have to fly inside of a moving structure, and 2) offer an interesting way to implement different paths inside of a single structure (fun for the player and fun for me to make). The first time you fly through it, the stairs might be leading to the top half of the structure, and the next time they might be leading towards the bottom. In my last post, I talked about the challenges in designing levels for InnerSpace. I faced every one of those challenges when designing this scenario.
Below are some of my hand-drawn sketches of this scenario.

Step Two:
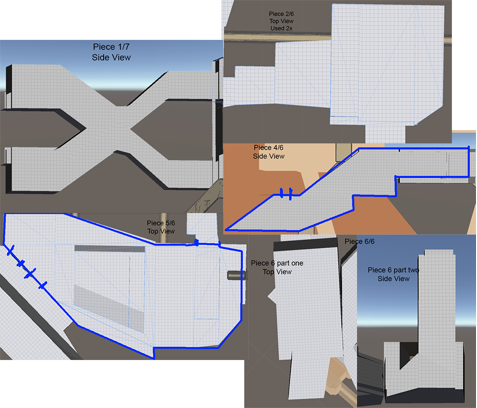
Below are screenshots of the individual pieces of the scenario built in Unity 5 using Probuilder 2. There are entrances in Pieces 1, 4, and two in Piece Six. In fact, two is used twice (that’s an image of the top one, but there’s another identical one underneath it).
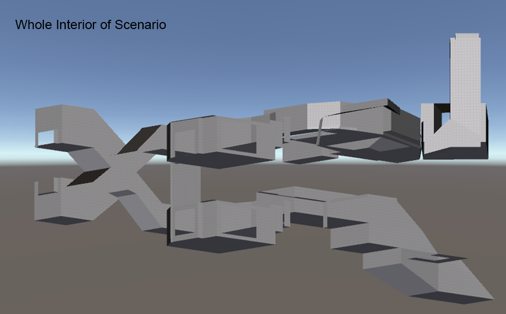
The second image is a screenshot of the whole scenario put together in its actual form.
I always find that this step takes the longest, and it usually results in the level looking completely different. Often, it’s like designing a whole new level, since sometimes something on paper doesn’t translate well into the software. This scenario was no different. I had to redesign this one three different times until I reached its current state…which is probably going to see more changes down the line.
Step Three:
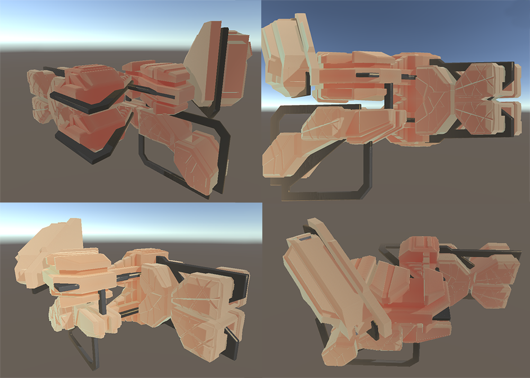
Each part of the scenario is made of at least one modular piece. What’s cool is when they’re combined, they make completely different shapes, which adds to both gameplay and visual appeal. If you look closely at the image below, you can see that I use a few of the same pieces in several different places, but when combined, such as in the second image, they have a completely different look.

Step Four:
For this scenario, I’ve made several changes based on feedback from the team about the appearance, playability, and overall design. Since we’re shooting for a design that fits the aesthetics of the world, I know that there will be things that change about this scenario as the world around it is developed and comes to life.
Conclusion
There’s just something about getting out the graph paper and white boards that makes me love being a level designer. I really think that it’s an extremely an important of the process to make a successful design. Brainstorming before ever even touching the software, then once in engine, being efficient. I follow the guidelines I made on paper, then playtest until I can play the level with my eyes closed. Playtest, and playtest, and playtest. When I make a change, I don’t just move on to something else, but then playtest at least ten more times.
I’ve always glad that I learned how to script. It makes me feel more valuable as a level designer and teammate. I’m not afraid to script my own levels. They’re never as pretty as something a programmer can make them, but they help everyone involved in the game.
Finally, I’m never afraid to revisit the drawing board. As a level designer, it’s my job to make sure every level/scenario that the player plays is fun, and sometimes that requires me makes changes or scrap ideas and make something new. After doing level design long enough, I’ve learned to never become too attached to any levels, as anyone who’s ever worked with me knows…
Trackbacks/Pingbacks