
This is a part of a series on Blender 3D- Part 1.
Serious 3D Modeling business ahead, no weenies allowed.

Making the jump from Maya to Blender can seem daunting at first, particularly given Blender’s negative, but undeserved, reputation for being overly complex and difficult to use. In the following post I hope to demystify Blender as a tool in order to help minimize barriers to entry and to help you make a more informed decision when considering the switch. This post is meant to illuminate some of the ease-of-use functions that Blender offers for modelers. (It won’t cover the following: scene navigation, adding geometry to a scene, basic selection & confirmation, saving, exporting, etc.) In this post, I’m going to assume the reader’s familiarity with the Autodesk Maya software package. Otherwise, said topics and their particularities are readily accessible.
With that said, here’s what you need to know to get up to speed with Blender 3D:
Num-Pad Camera Control + Image Plane Setup
Coming from Maya, one of the most useful modeling tools I found in Blender was the Numpad Camera System. The numbers 7, 1, and 3 map to Top, Front, and Side views, respectively, and allow for quick switching between orthogonal views without changing windows or sacrificing screen space for more viewports. Additionally, the number 5 will switch between Orthographic and Perspective cameras, allowing for a greater amount flexibility when defining shapes or matching forms. These features will only work with a numpad.
Pressing NUMPAD_5 switches between Orthographic and Perspective cameras.
Switching between angles with the Numpad. Pressing Ctrl + NUMPAD_7, NUMPAD_1, or NUMPAD_3 will show the opposite camera angles (Bottom, Back, Side).
Reference Images In Blender
One of the most useful distinctions between Blender and other 3D modeling packages is its integration of Reference Images. Put simply, the information is there when needed and gone when not. To setup Image Planes in Blender, open the Properties Shelf (3D Viewport > N > Background Images > Add Image)
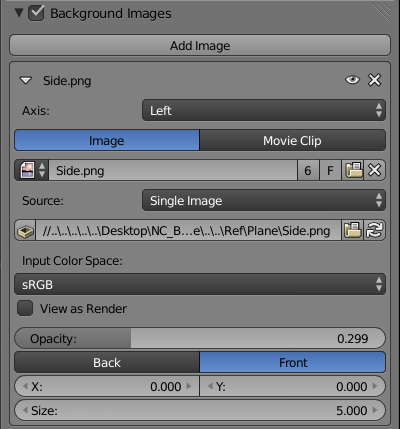
From here you can load any reference image you want, set it to whichever Axis (view) you want, and adjust its placement in the scene. Additionally, I found setting the opacity to ~30% and using the Front option was the easiest way to use the tool.

Image planes automatically hide themselves when the camera isn’t locked to one of the cardinal axes. NOTE: Image planes will only appear in an Orthographic viewport, so make sure you aren’t in Perspective.
Basic Modeling Controls + Axis Locking
When considering efficiency and productivity, the goal is to maximize the speed and control one has, particularly in the actions used most. Blender takes this to heart with its Axis Locking integration. I’ll demonstrate Axis Locking with the Grab/Translate function, but it’s implementation is global across scale, rotate, and extrude as well.
Pressing G allows the translation of a selected object and a RMB Click will confirm its placement. Prior to confirmation, pressing X, Y, or Z will constrain the objects translation to the selected axis.

These constraints can be used with any kind of selection (Edge selection above).
Vertex Snap
Another useful tool to speed up your modeling is the Vertex Snap toggle. Users can additionally hold CTRL when translating a selected vertex to switch the toggle to its opposite state. I prefer working with the toggle disabled and only enabling it when needed.
NOTE: Vertex snap is driven by the position of your cursor, not by the location of the vertex, itself. As demonstrated above, the snap only occurs when the cursor gets close to the intended vertex.
Auto-Merge Editing
One of my favorite feature gems found when switching to Blender, the Auto-Merge function is a huge time-saver and can really speed up the modeling workflow. This feature will automatically merge vertices that share the same location in 3D space and works extremely well with the Vertex Snap Feature.
Vertex Snap + Auto Merging = Speed. To enable, enter Edit Mode > Mesh > AutoMerge Editing
Fill Hole + Triangulate
Another workflow speed-boost:
With an Edgeloop selected, press F to fill the hole and CTRL + T to triangulate it.
Center Pivot
Centering the pivot, one of Blender’s stumbling blocks, can be a bit tedious. The best workaround I’ve found has been to enable the Dynamic Spacebar Menu plugin. You’ll have to remember some hot-keys for this one, but it will be committed to muscle memory in no time.
Tab into Edit Mode, make your selection or press A to select all, Spacebar > Snap Cursor Menu > Cursor to Selected, then Tab out of Edit Mode and press CTRL + ALT + Shift + C and select Origin to 3D Cursor.
Knife Tool
Another Simple tool is the Knife tool. In Blender, it’s activated with the K key, and it automatically snaps to vertices and the mid-point of edges.
Freezing Transformations
I feel that freezing or zeroing an object’s translation/rotation information is traditionally a good practice when finalizing a file. This is particularly true when importing the object into another software package or game engine.
Hit CTRL + A and select Location and Rotation and Scale.
Adding Edgeloops
Blender’s Edgeloop integration is also excellent. Much like its other commands, it’s tied to a simple key command, and learning it will drastically increase modeling speed.

While in Edit Mode, pressing CTRL + R will overlay an Edgeloop in Magenta. Scrolling up or down with the mouse wheel will add or remove additional Edgeloops to the overlay. RMB Click confirms the amount and allows you to slide along the selected edge for preferred placement. RMB Click will confirm and place the loops at the desired position. LMB Click will cancel out of the slide placement and will center the Edgeloops instead.
Proportional Editing (Soft Selection)
Soft Selection is one of the most powerful organic modeling tools in the Maya suite. A similar function, called Proportional Editing, is used in Blender.
Select a face, edge, or vertex and press O to enter Proportional Editing Mode. Hit G to grab and you should notice a white ring around your selection. This is the tool’s area of influence. Scroll wheel up or down to increase or decrease the affected area.
Mesh Select Mode Switch
Switch between edges, faces, and vertices on the fly with this hotkey setup.
When in Edit Mode: CTRL + Tab
Manipulator Orientation
Changing the 3D manipulator orientation is a crucial element of modeling in any software package. I use this function all the time to set the Z-axis to the normal direction of faces.
In the Properties Shelf, hit the pull-down menu under Transform Orientations, then select from the available options.
Additional Blender-Specific Features and Benefits:
- It’s Free
- Built-in Add-on Repository
- Feature-wide Search
- Modifier System
- Software Stability
- Excellent Documentation
- A catch-all for game development: sculpting & retopology, integrated game engine, particle systems/simulations, and animation & rigging.
Value for Indies and Students:
The recent explosion of independent video game development, crowdfunding, and digital marketplaces pulls an ever-increasing number of students in the arts and technology field toward independent development careers. Additionally, the cost for development has drastically decreased for independents, resulting from a recent shift towards lower operating costs, due to price drops for commercial game engines and other development software. With this context in mind, and understanding the difficulty educational institutions have with teaching current development methods, students are in a position where they have ample opportunity to excel, but lack the technical knowledge to do so. Due to the relative novelty of 3D independent development, and the tools used in its creation, there’s a lack of well-organized, concise, and thorough information. Most of the educational information available to beginners is either not free, dispersed, inconsistent, contradictory, or otherwise tedious to access. This environment requires that students waste their time cherry-picking between sub-par or incomplete resources, which is obviously not conducive to productivity. As a result, I hoped to demonstrate the practical application of the Blender 3D production software, in an attempt to better prepare students for independent development careers, and to aid in the transition from a high-cost product to a low-cost alternative.
Technical Info:
- Autodesk Maya 2013 x64
- Blender 2.71
Great post. One of my favorites that I thought I would mention is that when you want to do axis constraining while transforming a selection, instead of pressing x,y, or z, start moving in the direction you want to go and then press the middle mouse button to constrain the movement on that axis.
Apologies on the INCREDIBLY late response. I’m the worst.
That is super useful information, thank you!
Hey there.. Thank you for an interesting perspective on Blender.
If I may, I’d like to add a few comments about the content here..
For instance, you can turn on the ’emulate numpad’ in the user preferences to override the ‘standard’ number keys functionality (ie layers switching) so that they work as the numpad. Might not be as intuitive, but it’s a life saver when fiddling with it on a numpad-less laptop for instance.
Also there’s what I’d call ‘reverse axis constraint’ for the lack of a better term. Grab something and hit shift+z and you’ll constrain the movement to the X and Y axis. (Also works by shift clicking the manipulator)
You can also switch to local axis by hitting the axis button twice. G > X for world coordinates, G>X>X for local coordinates (normals or whatever you have set the transformation orientation to be).
Hope it helps! Happy blending!
Apologies on the INCREDIBLY late response. I’m the actual worst.
Thanks for the info. If I had known about it then I would have absolutely added the reverse axis constraint to the list. I use it like every day. 🙂
Great post.
Regarding your Manipulator Orientation tip: You don’t have to go to properties panel for this, as list of available transform orientations is already there in the window header, next to Vertex/Edge/Face switch 🙂
Moreover, it’s available under alt+spacebar menu.
Also, hitting x/y/z twice during transform switches between global and local, which is often helpful. You can also hit shift + x/y/z during transform, and it constrains transform to specified plane, rather than axis.
Last tip: to move vertex along the edge, just hit G twice 🙂
Hope this helps. 🙂
Apologies on the INCREDIBLY late response. I’m the actual worst.
Awesome tips! Thank you. the Slide Edge function is exceptionally useful.
Your approach for centering the origin is needlessly complex – you don’t need to enter edit mode and select geometry, or move the 3d curssor. Just press CTRL+SHIFT+ALT+C and select “Origin to Geometry”, which has the exact same results.
Apologies on the INCREDIBLY late response. I’m the actual worst.
Ah, yeah thanks. I think what I intended was to demonstrate that you could move the pivot to a specified location, not just the center of the grid or object. I should have been more clear though. Thank you!
Nice article. I’ve been interested in using Blender for a long time, but always found it was difficult to switch because the company was using Maya already, and Blender was hard to get used to when I’m still dealing with Maya on a regular basis, or was immature. However, with the most recent releases, the developers have fixed many of Blender’s limitations* and it has become a very serious alternative to Maya.
Not only does Blender shine in some key areas needed for many types of game, such as polygon modelling animation and uv unwrapping, when compared to Maya, but it’s free. Being free is obviously a great thing for small studios that don’t have lots of money to throw at Autodesk, but there are less obvious benefits to this. The main thing is that you don’t deal with overprotective install procedures and DRM. You just go to the Blender website, get the latest version and you are golden. Not only this, but your entire team can be on the latest version at all times. For very large companies, such as Ubi Soft or EA, it might be no problem to buy everyone the latest Maya or Max and make sure the entire team is up to date, but even in mid-size companies it’s common to find people working with several different versions of Maya or other expensive software (Photoshop for example). This can sometimes lead to problems with file compatibility, or people not having access to the latest tools they need (e.g. an animator having a recent version that has updated modelling tools, but a modeller being stuck with the old version – there is no quick or free solution to this with Maya). This doesn’t happen with Blender, and it’s also easy to get old versions of the software and quickly install anywhere if there is a compatibility problem. Not only that, but it permits people to work legally at home or install on multiple machines without floating licenses or carrying around usb dongles. The Free thing is HUGE.
Anyway, I finally got fed up with the ridiculous bugs in Maya today and am trying to do more work in Blender and reduce my dependency on Maya. Blender definitely has a few issues (such as the difficulty of editing multiple objects at once), but I feel nothing but positivity about the community and future of the software. The Blender Foundation seem to have one of the best managements that I’ve seen on any open source project and are extremely open about their roadmap and what they are working on. If I finally do make the crossover to Blender for good, I will have no qualms making donations.
Inner Space looks really cool by the way! Is it all done with Blender?
* Examples of some of the improvements for game dev:
1. The Fbx import/export tool is quite useable now!
2. You can set custom vertex normals and set hard/soft normals as easily as you can in Maya… meanwhile, Maya seems to have horrific bugs in custom normals since 2013
3. Baking has been improved lately, though this might be a community addon (BakeTools)
Apologies on the INCREDIBLY late response. I’m the actual worst.
Haha, great points. I would only add that Blender also drives competition. Frankly, I don’t see why larger studios don’t make the switch. I suppose sponsorship MAY be a concern, or legacy software might be the bottleneck, but Blender being so good will only drive the other companies to make their software better.
I hope you’ve made the switch, It’s been quite liberating for me. I use Maya at work, so I definitely understand the difficulty in using both. It is doable, however, just build up that muscle memory.
Also, thanks for the compliment on InnerSpace. Most of the modeling is done in Blender, yes. I’ll jump into Zbrush for the larger creatures, landscape elements, etc. though.
Cheers!